Mastering GitHub Collaboration Skills#
Contributing to open source in a public space like GitHub can feel intimidating. You may not know the project maintainers, feel unsure about your GitHub skills, or wonder where to begin.
This lesson series will teach you how to collaborate on code and documentation using GitHub. It will help you confidently contribute to a GitHub repository and build skills to collaborate with colleagues (some of whom you may not have met in real life!).
Get started with your first open source contribution#
What you will learn
Completing this set of activities will give you the technical and social skills needed to collaborate and contribute to an open source GitHub repository. You will use the pyOpenSci example GitHub repository as a safe space to practice making contributions.
This page introduces all of the steps and walks you through each one. Each activity below has a lesson that will help you understand the social and technical elements of the contribution process.
An overview of the collaborative GitHub workflow#
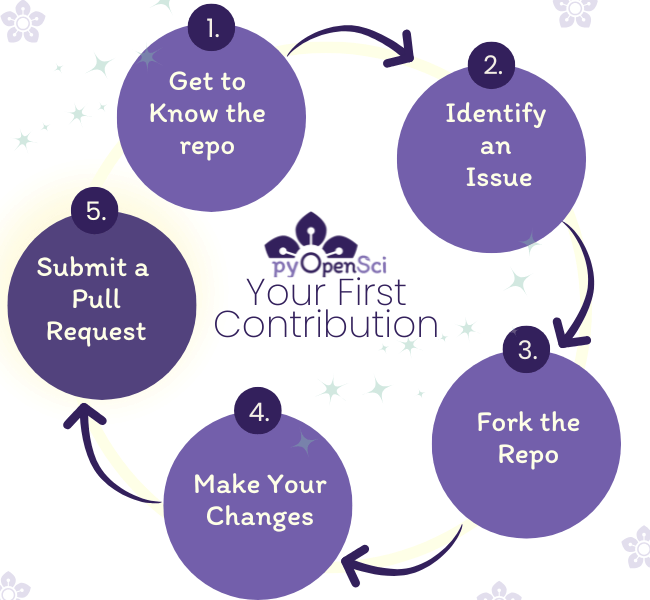
The steps for making your first contribution to an open source repo. In this lesson, you will do all of your work on GitHub.com, meaning you don’t need to clone or make a copy of your repository locally. This is a great way to get started with contributing. It minimizes the command line skills that you will need to use git.#
A step-by-step guide to your first contribution#
Step 1: Identify the repository and get to know it#
First, identify and get to know the repository you want to contribute to. Use the pyOpenSci learning repository to test out the process.
Getting to know that repository will save you and the maintainers time when you make your first contribution. You can think about like doing some research on a blog post before sitting down and writing it.
Ideally, the repository you have chosen has documented the types of contributions they welcome and what process they want contributors to follow. Reading through that documentation first will help you get started quickly and minimize the questions you ask the maintainer team. Most often, the best place for a new contributor to start, regardless of their experience contributing, is the contributing guide and the README file.
Learn how to get to know a GitHub repo
Activity 1: Get to know the repository
Open a new browser tab after reading through the get-to-know a repo lesson. Navigate to pyOpenSci/pyos-demo-package-contribute.
Review the README and CONTRIBUTING files.
Answer these questions
Does the repository accept contributions? If so, what types of contributions are accepted?
Are there existing issues open in the repository? Do those issues have labels?
Is the contribution process documented in the repo?
Does the repository use specific code or text formatting standards or liters?
Does the repository have continuous integration (CI) set up?
What is the license associated with the code in the repository?
Are the issues labeled, and are there “good first issue” or “help wanted” labels
Step 2: Find an issue to work on#
Next, identify an issue or bug that you want to work on. Sometimes, there is already an open issue in a repo that you want to address. So, reading through existing open issues before opening a new one is always a good idea. If you already have a fix in mind that doesn’t exist in the existing issue list, you will create a new issue in the repo.
Learn how to identify and open a GitHub issue
Activity 2: Create an issue for a bug that you’d like to fix
Navigate to the pyOpenSci example repo.
Explore the documentation and code. You will find many items that need to be fixed, including spelling errors, typos, and more.
Pick a file that you’d like to work on. Open a new issue specifying what you’d like to fix.
Wait for someone on the pyOpenSci team to respond to you with next steps.
Once you have submitted an issue and someone has responded positively, you can begin working on the changes in your fork. You will learn how to fork a repo next.
Step 3: Fork the repository#
Once you have created an issue or identified what you wish to work on, you will Fork or create a copy of the repo in your GitHub account.
Learn how to fork a GitHub repo
Activity: Fork a repository and modify a file
Fork the pyOpenSci practice GitHub repository
Navigate to the pyOpenSci example repo.
Fork the repository.
Remember that a fork is a copy of a repository that is owned by someone else or an organization that lives in your GitHub account.
Step 4: Edit and commit your changes#
Once you’ve successfully forked the repo, it’s time to edit the file you want to fix. In this lesson, you are editing documentation files in the GitHub interface. This means that you don’t need to set up a local development environment.
Learn how to edit & commit files on GitHub
Activity: Make a change to a file and commit it to your fork
Navigate to your fork on GitHub.com
In the GitHub interface, click on the file that you proposed to modify or fix in the identify issue lesson
Click on the edit button in the GitHub interface.
Make the edits to the file that you proposed in your issue.
Hit the commit button to save your edits
Add a descriptive commit message that describes the change that you made
Commit message examples:
fix: fixed numerous typos in the filename.py file
fix: updated the code to align with PEP 8 syntax
fix: fixed typo in docstring text
Step 5: Submit a pull request#
Once your edits are committed to git version control, open a Pull Request to the parent repository.
Learn how to create a GitHub pull request
Activity: Submit a PR to the pyOpenSci parent repository
Create a Pull Request to the pyOpenSci parent repository, from the branch on your fork that you worked on in the previous lesson.
Once your PR is open, it’s time to sit back and wait for the maintainers, collaborators, or project owners to review/comment on your PR. Be patient; this step can take time as people are busy and often donate their time to this effort!
Many people’s first contributions are to documentation#
In this lesson, you make your first open source contribution by updating documentation (including docstrings) rather than code. Many people start with small fixes like typos, which are simpler to contribute as you don’t always need a development environment but are still highly valuable.
Fresh eyes make a difference! #
When you’re new to a project, you may notice gaps and unclear explanations that long-time contributors might overlook. Maintainers and developers are often too close to their own work to see what’s missing. Your perspective helps make the project more accessible to future contributors.
By catching confusing phrasing, outdated information, or missing details (even in contributing documentation), you improve the onboarding experience for others while making a meaningful first contribution!
A real-life first contribution to PyPI
Here is an example issue that resulted in 2 small pull requests to PyPI (warehouse). In this case, the images were outdated, so it was a bug in the documentation that needed to be fixed. However, while getting to know the repository, the author also found issues with the development documentation, so they submitted a pull request to address that as well. Both pull requests were small.