Dependencies for your Python Package#
In the pyproject.toml overview page,
you learned how to set up a pyproject.toml file with basic metadata
for your package. On this page, you will learn how to specify different types of
dependencies in your pyproject.toml.
What is a package dependency?#
A Python package dependency refers to an external package or
A tool that is needed when using or working on your Python project. Declare your dependencies in your pyproject.toml file. This keeps all package metadata in one place, making it simpler for users and contributors to understand your package.
Older ways to declare dependencies
While pyproject.toml is now the standard, you may sometimes encounter older approaches to storing dependencies “in the wild”:
requirements.txt: Previously common for dependencies, still used by some projects for local development
setup.py or setup.cfg: May be needed for packages with extensions in other languages
Why specify dependencies#
Specifying dependencies in the [project.dependency] array of your pyproject.toml file ensures that libraries needed to run your package are correctly installed into a user’s environment.
For instance, if your package requires Pandas to run properly, and you add Pandas to the project.dependency array, Pandas will be installed into the users’ environment when they install your package using uv, pip, or conda.
[project]
...
...
...
dependencies = [
    "pandas",
]
Development dependencies make it easier for contributors to work on your package. You can set up instructions for running specific workflows, such as tests, linting, and even typing, that automatically install groups of development dependencies. These dependencies can be stored in arrays (lists of dependencies) within a [development-group] table.
[development-group]
tests = [
    "pytest",
    "pytest-cov"
]
Types of dependencies#
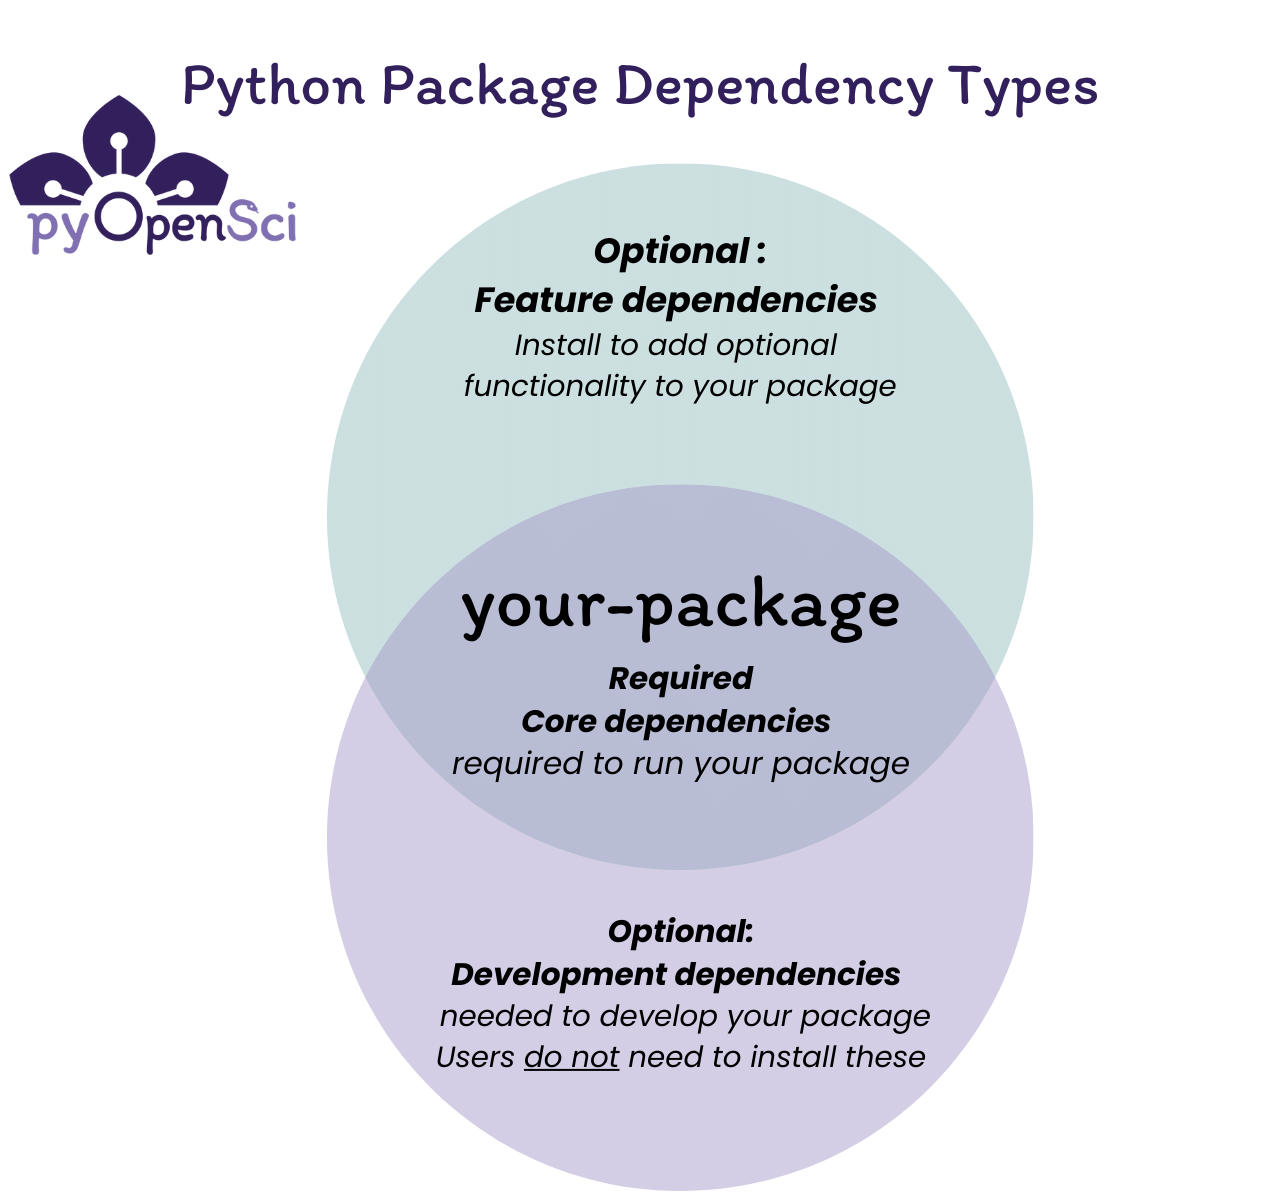
There are three different types of dependencies that you will learn about on this page:
Required dependencies: These are dependencies that need to be installed for your package to work correctly in a user’s environment. You add these dependencies to the
[project.dependencies]table in your pyproject.toml file.Feature Dependencies: These are dependencies that are required if a user wants to access additional functionality (that is not core) to your package. Store these in the
[project.optional.dependencies]table or your pyproject.toml file.Development Dependencies: These dependencies are required if someone wants to develop or work on your package. These include instance linters, testing tools like pytest and mypy are examples of development dependencies. Store these in the
[project.dependency.groups]table or your pyproject.toml file.
Tip
A dependency is not part of your project’s codebase. It is a package or software called within the code of your project or used during the development of your package.
1. Required dependencies#
Required dependencies are imported and called directly within your package’s code. They are needed for your package to run.
You can add your required dependencies to the dependencies array in the
[project] table of your pyproject.toml file. When users install
your package with uv, pip, or conda, these dependencies will be
automatically installed alongside your package in their environment.
[project]
name = "examplePy"
authors = [
    {name = "Some Maintainer", email = "some-email@pyopensci.org"},
]
dependencies = [
    "pandas",
    "matplotlib",
]
Tip
Try your best to minimize dependencies whenever possible. Remember that fewer dependencies reduce the possibility of version conflicts in user environments.
How to Add Required Dependencies with UV
You can use uv to add dependencies to your pyproject.toml file:
Add a required dependency:
uv add numpy
Will add numpy as a dependency to your project.dependency array:
[project]

dependencies = [
    "numpy>=2.2.6",
]
Requiring packages from GitHub / Gitlab
If you have dependencies that need to be installed directly from GitHub, you can specify them in your pyproject.toml file like this:
dependencies = [
"my_dependency >= 1.0.1 @ git+https://git.server.example.com/mydependency.git@commitHashHere"
]
IMPORTANT: If your library depends on a GitHub-hosted project, you should point to a specific commit/tag/hash of that repository before you upload your project to PyPI. You never know how the project might change over time. Commit hashes are more reliable as they can’t be changed
2. Optional dependencies#
Optional (also referred to as feature) dependencies can be installed by users as needed. Optional dependencies add specific features to your package that not all users need. For example, if your package has an optional interactive plotting feature that uses Bokeh, you would list Bokeh as an [optional.dependency]. Users who want interactive plotting will install it. Users who don’t need plotting don’t have to install it.
Place these dependencies in the [project.optional-dependencies] table.
[project]
...
...
...
[optional.dependencies]
plot = ["bokeh"]
When a user installs your package, uv, pip, or conda automatically installs all required dependencies. Optional dependencies are only installed if the user explicitly requests them.
How to Add optional.dependencies using UV
You can use uv to add dependencies to your pyproject.toml file:
Add an optional dependency:
uv add --optional feature pandas
Will add this to your pyproject.toml file:
[optional.dependencies]
feature = [
    "pandas>=2.3.3",
]
3. Dependency groups#
Development dependencies include packages needed to work on your package locally. They are used to perform tasks such as:
running your test suite (pytest, pytest-cov)
building your documentation (sphinx, sphinx-theme packages)
linting and formatting code (ruff, black)
building package distribution files (build, twine)
Dependency groups are optional because they are not required for users to install and use your package. However, they will make it easier for contributors to your project to setup development environments locally.
New: PEP 735 development dependency groups
[development-groups] is a newer specification introduced by PEP 735.
They are intended to organize development dependencies and are intentionally separate from [project.optional-dependencies], which can be installed into a user’s
environment.
How to declare dependency groups#
You declare development dependencies in your pyproject.toml file
within a [development-groups] table.
Similar to optional-dependencies, you can create separate subgroups or arrays with names using the syntax: group-name = ["dep1", "dep2"]
[development-groups]
tests = ["pytest", "pytest-cov"]
docs = ["sphinx", "pydata-sphinx-theme"]
lint = ["ruff", "black"]
How to Add [development.group] using UV
You can use uv to add dependencies to your pyproject.toml file:
Add a development group dependency:
uv add --group tests pytest
uv add --group docs sphinx
Will add the following to your pyproject.toml file:
[dependency-groups]
tests = [
    "pytest>=8.4.2",
]
docs = [
    "sphinx>=8.1.3",
]
Understanding required vs. optional dependencies#

Python package dependencies fall into two categories: required dependencies that users need to run your package, and optional dependencies for development work or additional features.#
Additional dependency resources
Install dependency groups#
When someone installs your package, only core dependencies are installed by default. To install optional dependencies, you need to specify which groups to include when installing the package.
![Diagram showing a Venn diagram with three sections representing dependency groups - docs, feature, and tests. In the center it shows your-package with core dependencies seaborn and numpy. Two arrows on the right demonstrate: first, python -m pip install your-package installs only the package and core dependencies. Second, python -m pip install your-package[tests] installs the package, core dependencies, and test dependencies including pytest and pytest-cov.](../_images/python-package-dependencies.png)
When a user installs your package using pip install your-package, only
your package and its core dependencies get installed. When they install
with pip install your-package[tests], pip will install your package,
core dependencies, and the test dependencies from the
[project.optional-dependencies] table.#
Using uv or pip for installation#
UV streamlines this process, allowing you to sync a venv in your project directory with both an editable install of your package and its dependencies automatically. You can also use pip and install dependencies into the environment of your choice.
Install development groups:
You can use uv sync to sync dependency groups in your uv-managed venv
uv sync --group docs                     # Single group
uv sync --group docs --group test        # Multiple groups
uv sync --all-groups                     # All development groups
Install optional dependencies:
# uv pip install is not idea if you are using uv supported venvs for your project
$ uv pip install -e ".[docs]"              # Single group
$ uv pip install -e ".[docs,tests,lint]"   # Multiple groups
Install everything (package + all dependencies):
uv sync --all-extras --all-groups
uv sync is the recommended command for development workflows. It
manages your virtual environment and keeps your lockfile up to date.
Use uv pip install when you need pip-compatible behavior.
Install optional dependencies:
python -m pip install -e ".[docs]"              # Single group
python -m pip install -e ".[docs,tests,lint]"   # Multiple groups
Install dependency groups:
python -m pip install --group test              # Single group
python -m pip install --group docs   # Multiple groups
Always call pip using python -m pip to ensure you’re using
the pip from your current active Python environment. This helps avoid
installation conflicts.
Note: Some shells (like zsh on Mac) require quotes around brackets to run successfully:
python -m pip install ".[tests]"
Combining dependency groups#
You can also create combined groups that reference other groups:
[project.optional-dependencies]
test = ["pytest", "pytest-cov"]
docs = ["sphinx", "pydata-sphinx-theme"]
dev = ["your-package[test,docs]", "build", "twine"]
Then install everything with pip install or uv sync as needed:
uv pip install -e ".[dev]"
# or
python -m pip install ".[dev]"
Tip
When you install optional dependencies, pip and uv install your package and its core dependencies automatically.
Version specifiers for dependencies#
Version specifiers control which versions of a dependency work with your package. Use them to specify minimum versions, exclude buggy releases, or set version ranges.
Common operators#
>=Minimum version set:numpy>=1.20(This is the most common approach and is recommended)==Exact version:requests==2.28.0(Avoid pinning dependencies like this unless necessary)~=Compatible release:django~=4.2.0(Allows patches: >=4.2.0,<4.3.0)<or>- Upper/lower bounds:pandas>=1.0,<3.0!=Exclude version:scipy>=1.7,!=1.8.0(Rare but allows you to skip a buggy release version)
Tip
Best practice: Use >= to specify your minimum tested version and
avoid upper bounds unless you know at what version that dependency is no longer compatible. UV will do this by
default when it adds a dependency to your pyproject.toml file. This keeps
your package flexible and reduces dependency conflicts.
dependencies = [
    "numpy>=1.20",              # Good - flexible
    "pandas>=1.0,<3.0",         # OK - known breaking change in 3.0
    "requests==2.28.0",         # Avoid - too restrictive
]
The pyproject.toml file works great for pure-Python packages. However,
some packages (particularly in the scientific Python ecosystem) require
dependencies written in other languages like C or Fortran. Conda was
created to support the distribution of tools with non-Python dependencies.
For conda users:
You can maintain an environment.yml file to help users and contributors
set up conda environments. This is especially useful for packages with
system-level dependencies like GDAL.
Consider Pixi for conda package focused workflows:
Pixi is a modern package manager built on top of both
the conda and Python package ecosystems.
Pixi is able to treat conda and Python package requirements with parity when
resolving environments, but uses a “conda-first” approach of using already
resolved conda packages if possible when resolving Python dependencies.
Pixi can also use pyproject.toml for configuration.
If your project relies heavily on conda packages, Pixi offers a streamlined
workflow with faster dependency resolution and automatic lock file support for
full environment reproducibility.
If you already have an existing conda environment definition file, like
an environment.yml, you can
import the environment into a new
Pixi workspace with
pixi init --import environment.yml
A note for conda users
If you use a conda environment for development and install your package
with python -m pip install -e . dependencies will be installed from PyPI,
potentially overwriting conda packages that had already been installed.
This can cause conflicts, especially for packages with system dependencies.
To avoid this, install your package without dependencies:
python -m pip install -e . --no-deps
Then install dependencies through your conda environment.yml file.
Dependencies in Read the Docs#
Once you’ve specified dependencies in your pyproject.toml, you can use
them in other workflows like building documentation on Read the Docs.
Read the Docs is a documentation platform that automatically builds and publishes your documentation. To install your dependencies during the build process, configure them in a readthedocs.yaml file.
Here’s an example that installs your docs optional dependencies:
python:
  install:
    - method: pip
      path: .
      extra_requirements:
        - docs
Learn more about Read the Docs

